It’s 9 am and you are enjoying your first cup of coffee for the morning while reading your e-mail. Your boss runs into your office, breathing hard, with sweat running down his brow. He says the senior management team wants to see your proposal in conference room B at 10 am. Not a problem you think, you’ve got the Powerpoint ready to go and you have been waiting for this chance for months.
Then he drops the thousand pound ball on your desk…
“The bulb is out on the projector in room B and all the other rooms are taken. You’ll have to do the presentation without Powerpoint,” he says.
 You drop your cup and a cold sweat comes over you. This proposal means a lot and without Powerpoint you are dead in the water. You pace back and forth thinking about your poor speaking skills. “You really should have gone to that last Toastmasters meeting”… you think to yourself. What can you do now?
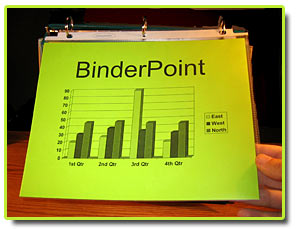
All of a sudden something clicks… that blog post on that internet blog said something about a Binderpoint presentation and a notebook. Hmmm… you quickly pull up the page and download the Powerpoint template. You open it in PowerPoint and everything is larger. The fonts are bigger and the charts and graphs all have larger fonts. The file contains 10 different template pages with charts, graphs and bullet point pages.
The instructions are simple. Keep your words short, make the presentation simple, and print everything out on colorful paper. When you are done put the pages in clear plastic sleeves in a notebook. Put the notebook on the podium with one cover hanging over the edge. Start with your title page first, and then bring one page over at a time to change slides. A paper based Powerpoint presentation in a binder.
 You send your assistant to the supply room to get you a binder and some clear protector sheets. You take the outline you had in word and start making new slides using the enclosed PowerPoint template pages. With some simple cutting and pasting you have your slides coming along nicely. You insert your main points into the bullet pages. The time is clicking away, but the simple pages are keeping you humble with your words. Instead of cluttered pages of 6 or 7 bullet points you now have just a few words on each page.
You open the enclosed graph and quickly highlight the proper quarterly data. In just 5 minutes the graph is looking good. You open the idea cloud slide and insert one of your power words. Click… done! Soon you have 10 powerful slides. You move them around in your presentation and delete the slides in the template that you didn’t use.
You click print to send the job to your laser printer to print a full page from each slide. Soon the pages are printing on colorful heavyweight paper. You take each of your pages and quickly insert them into the plastic sleeves. Your assistant opens the binder and you put the pages in backwards and reverse order. You quickly test the process, smile broadly, and give your assistant a high-5. You grab your notes and the notebook and head for the conference room.
The room has a small lectern, so you open your notebook and drop the notebook cover down the front of the lectern and turn over your first slide. You are ready. The whole presentation took less than 50 minutes to create and you ended up with 10 powerful slides. You printed a notes page from powerpoint so you could tell at a glance which slide was next.
The senior managers walk in the door, and you greet each one by name. You explain the problem with the projector and suggest that everyone move closer. Everyone sits around the small conference table and you start your presentation. The large fonts are clearly readable across the table and your printed notes page guides you smoothly.
Instead of reading each slide, you take off with your own story about your proposal. The words flow and you find yourself relating much better to your audience than you ever have before. The simple format keeps the focus on you instead of the presentation. You talk about cost savings and turn over the graph slide. The larger bars make it easy to read, and the yellow paper made the whole thing pop. You were lucky to have a color printer for that slide but realize it would even work well in black and white.
You finish the presentation with your idea cloud and power word. You look at senior management and ask for their approval. One by one they all give you a resounding YES! After the meeting is over they all congratulate you on a job well done and compliment you on your ingenuity to go on with the presentation, even though the projector was down. As you are walking out of the room your boss mentions something about a performance bonus.
Not a bad day with only 50 minutes of prep time. The Binderpoint presentation reminds you of the old boy Scout motto… always be prepared!
To make a Binderpoint presentation you need
1 inch vinyl binder or other notebook
Clear page protectors
Heavyweight colored paper stock
Binderpoint Page Template for Powerpoint
Optional Equipment
Easel Binder
Instructions:
- Download the Binderpoint template and open up in Powerpoint.
- Modify the template pages with your text and content.
- Copy and paste template pages as needed.
- Delete unused pages
- Print out on heavyweight colored paper.
- Insert your printed sheets in the clear page protectors
- Put the pages in the 1 inch vinyl binder in reverse order
- Test your presentation on a table or other flat surface
- Put one side of the binder on the table and hang the other off the edge.
- Test your page flow, rearrange as necessary.
- When presenting use a desktop lectern, podium, or an Easel Binder.
- Present to your audience.
Our 5 Minute Outliner or Pocket Storyboarder work well to plan out your presentation in advance.
The Binderpoint presentation also works well when viewed on a laptop screen at close proximity.
Technorati Tags: Powerpoint, Public Speaking, Presentations
