I had a friend ask the other day, what is Pinterest? I had heard it was a virtual pinboard but I wasn’t sure what that meant. I figured it was just another social media network and would soon disappear off of the radar screens like so many others have. Yet I started hearing from my blogger friends that they were getting traffic from this new resource. I decided to click over and take a look.
The first thing I noticed was that you couldn’t just sign up. You needed an invite. So I clicked on the bright red “Request an Invite” button. Two days later I received an email from them inviting me to join. I followed the instructions and signed up using my existing Twitter account. This automatically pulled in my Twitter profile and avatar and linked my account so I could tweet my followers. Pinterest also allow you to sign in with your Facebook account or setup a profile from scratch.
Once my account was active, I was presented with a screen to pick my interests. It had over 20 classifications to choose from. While Pinterest has a primarily female audience, there are a lot of great categories for the guys too. I started with a half dozen that sounded good.
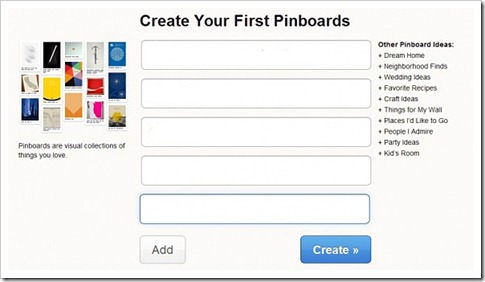
Then I was asked to create my first pinboards. I decided that some of my popular categories on my blog would make great pinboard names. I started with…
- Goals
- Productivity
- Quotes
- Presentation
- Downloadables
These create empty boards that I can add content to.
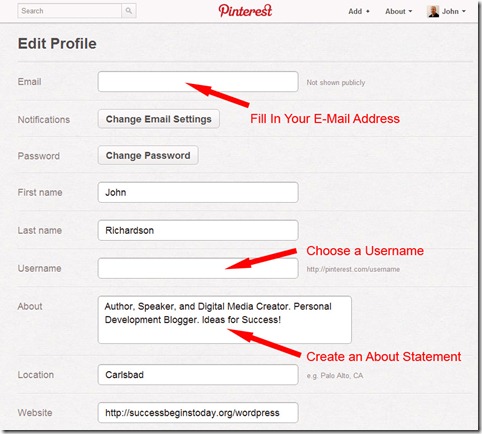
The next step is to fill in your profile.
If you signed in with Twitter or Facebook some of the boxes may already be filled in with profile information from those services. Here is what it looks like. Once you have that filled in you are ready to start pinning.
Now you’ll want to completely setup your first boards.
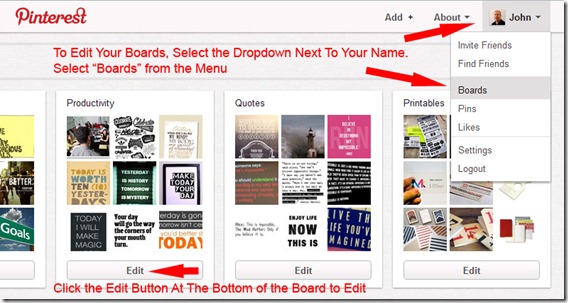
To start, click the Pinterest logo at the top of the page. This will take you to the main page. Select the pull-down next to your profile pic and select boards from the menu. This will open a screen showing all of your current boards. If you are just getting started, you’ll see a lot of empty boxes.
Select the “Edit” button at the bottom of each board to edit.
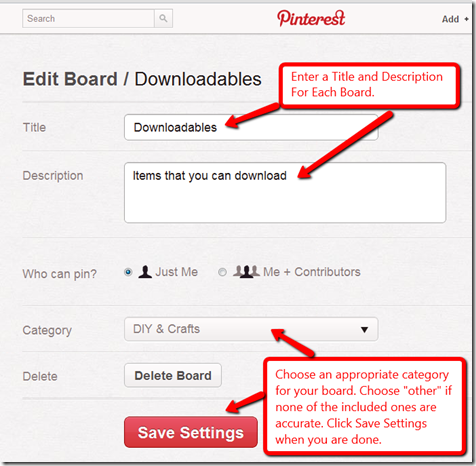
In the edit board screen fill in the name of the board, the description and match it up with one of the built-in categories. If none of the included categories match, choose “other” from the list. Click “Save Settings” when done
Now you can Repin your first pin. Click on the Pinterest icon at the top of the screen This will take you to the main screen. You’ll see the recent pins from lots of users in your chosen categories.
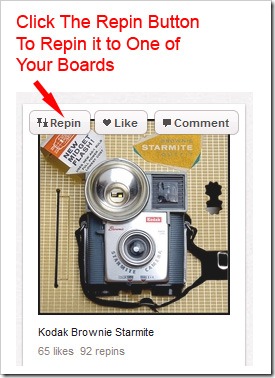
To add a pin to one of your boards, move your mouse over a desired item. Three boxes will open, Repin, Like, and Comment. To add the item to one of your boards, click Repin.
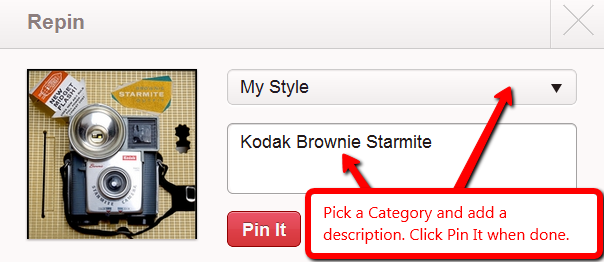
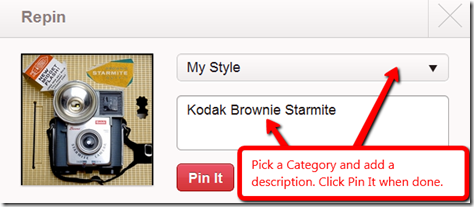
This will open the Repin dialog box. Select the proper board category for your pin and add or edit the description of the item. Click Pin It when you are done.
Now you have successfully signed up and created your basic board setup in Pinterest. As you can see from the last step, adding other people’s pins is really easy. In just a few minutes you can add some really cool pins to you boards and be on your way to a successful Pinterest board layout.
Tomorrow we’ll look at adding your own content.
Question: Have you used Pinterest before?

