The new 2007 Office Suite from Microsoft offers a lot of new functionality for the user. If you have installed one of the popular versions you have undoubtedly noticed the new ribbon interface in Word, Excel, and Powerpoint. While this can be intimidating at first, you’ll soon find that it will start to make sense and actually speed things up once you get used to it.
In this short Word 2007 tutorial I want to take you through some more advanced features of Word and show you how to tie it in with formatted table elements.
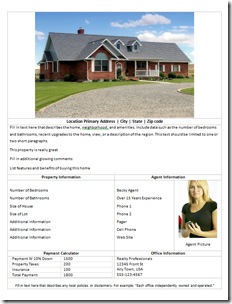
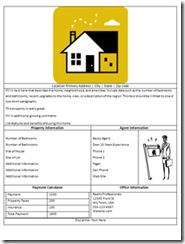
Let’s get started. Use the document picture below as a reference. You can also download the Finished Real Estate Flyer to make it easier to follow along.
One of the more popular uses of MS Word is to create flyers for business use. In this example we’ll create a flyer that can be used by real estate agents to highlight their properties. We’ll include a place for a large picture, we’ll offer a payment calculator that is easily updated, and include a convenient place for property and agent information.
Step 1. Creating the Page Layout
The first thing we need to do is layout our page in Word with lots of space to work. By default, Word comes with pretty restrictive page margins. For a flyer we want to maximize these. This is real easy in the 2007 version.
- Open Word with a blank document
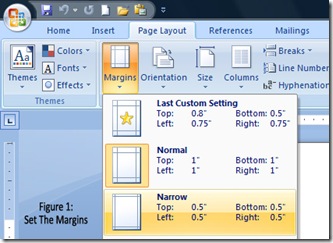
- Click on the Page Layout tab
- Click on the Margins button
- Select Narrow from the pull-down list (Figure 1)
Now you have a page that is maximized with a 1/2 inch margin all around that works with most printers and will give you lots of space for graphics and text.
Step 2. Adding a Table for Structure
If you have ever worked in a word processor before you’ll know that page layout with graphics and text can be a real challenge. Everything is setup to flow around the page text. With the basic page setup in Word you have limited options to make your page look right.
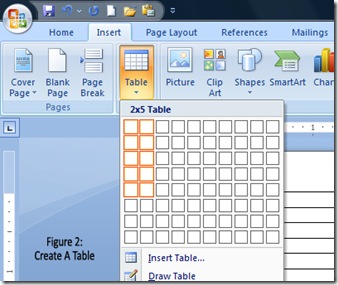
This is where tables come in handy. Tables give you structure and keep things aligned properly. Let’s add a table that will give us a place for our property picture, our payment calculator, and a couple of boxes for property and agent information (Figure 2).
- Click on the insert tab in the ribbon interface
- Select table from the list (Figure 2)
- Bring your mouse down as in figure two
- Select a 2 column by five row table
- Click your mouse to create the table
Now we need to format our table for our page elements. Since we want our graphic and home description line to span the entire page we need to merge the top two cells from two columns to one.
- Put your mouse in the top row of the table (Figure 3)
- Hold down the shift key and click in both top cells to select them
- Right click on the mouse and select merge cells
- You now have a row that spans the entire document
- Repeat step one and two on the second row
Step 3: Adding Text & Graphics To Our Table
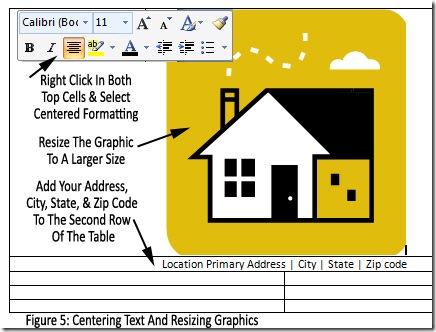
Let’s add a clip-art placeholder for our house picture, add our picture caption, and center both cells in the table.
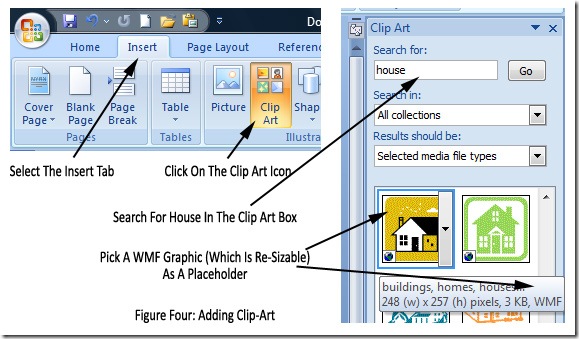
- Click on the insert tab and select clip art from the menu (figure 4)
- Do a search for “House” in the clip art search menu
- Find a simple “WMF” type graphic (resizable) as our picture placeholder
- Make sure your cursor is in the top table cell
- Double click the desired graphic to add it to the table
- Your graphic has now been added to the top cell in the table
- Click the graphic to select it and use the handles to resize it larger
- Click elsewhere in the top cell, right click, and select centered formatting
- Your graphic is now centered
- Add placeholder text for your address in the second row of the table
- Select the text, right click, and select centered formatting
Step 4: Fill In The Rest Of Our Cells
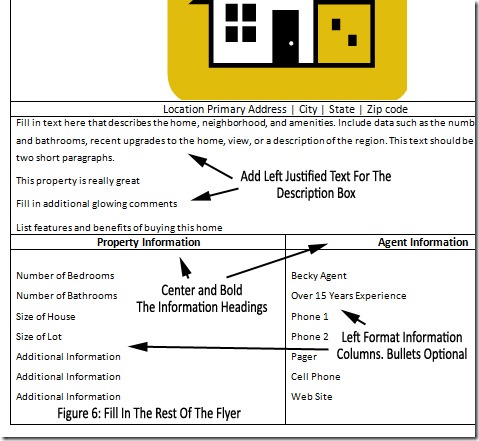
Let’s fill in the rest of our table. We need to add a property description box, informational headings, and our property and agent info.
- In row three we want our property description text.
- Merge both cells in row three as we did above
- Add a few lines of property description text
- Leave the formatting as left justified.
- In row four we want to include 2 information box titles
- Add the words Property Information to the left cell, center formatting
- Add the words Agent Information to the right cell, center formatting
- In row 8 put property info in the left box and agent info in the right
- Your basic flyer is about done
Step 6: Add A Payment Calculator
Lets add three more rows for some additional features.
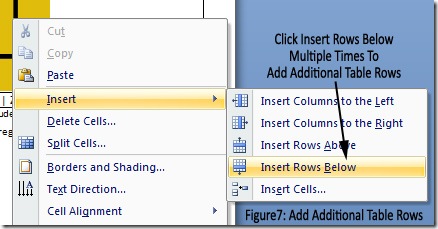
- Put your cursor in one of the current bottom cells of your table
- Right click and select Insert / Insert Rows Below
- Repeat this three times to add three additional rows to the bottom
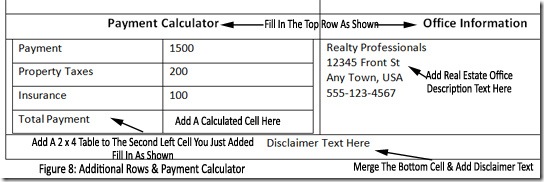
- Use the diagram above as a reference (Figure 8)
- In the first row you added add Payment Calculator & Office Information Text
- Center and Bold as shown above
- Add a 2×4 nested table to the left cell in the new second row (Put your cursor in the cell and select 2 columns by 4 rows in the table dialog. Figure 2 shows the table creation procedure)
- Fill in the 2 x 4 table with Text as shown (Leave the calculated cell blank)
- In the right cell in the new second row add office information
- Merge the third row and add disclaimer text
Add a calculated cell to sum up the totals
- Click in the bottom right of your payment calculator nested table (figure 8)
- Click on the formula icon on the layout tab in Word
- Make sure the calculated fields look like figure 9
- This will insert a calculated field and add up the total payment numbers
- The calculated field should now show 1800
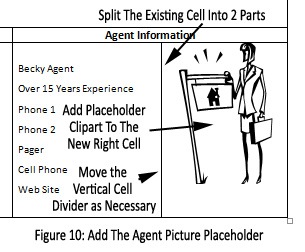
Step 7: Agent Picture
Add your agent’s picture to the agent information area
- Right click in the agent information cell and click split cells
- Your cell is now divided in two
- Place your cursor in the new right cell
- Add a small clip art person as a place holder in the cell
- Move the vertical cell line as necessary (Figure 10)
Step 8: Finish Up
Now your document should look like the picture above. You can add text, change line spacing, or change the text size to fill up your page. This flyer can be used for multiple projects. Just change the pictures and the text. Digital photos work well for the house and agent pictures.
You can recolor the main table to a light gray to minimize the lines and use different fonts and colors for emphasis. Have fun!

