Out of the box, Twitter comes with 20 built in themes that you can select from. They range from the default light blue theme with clouds, to more whimsical themes featuring leaves, trees, and birds. While these themes are a good starting point, you’ll certainly want to change the background to show the world who you are.
For a business or personal niche site, you’ll want a customized background that lists your name, contact information, and a blurb about your product, service or niche.
There area few common ways to do this. You can go to one of the popular Twitter background sites and download one of their free offerings, create one in a high end graphics program like Photoshop, or have a designer create a custom one for you.
Unfortunately, most people don’t have Photoshop and spending a hundred dollars on a custom background is probably out of the budget range, so many people go with a free background that has a branded logo on it.
If you have Powerpoint on your computer though, you can create a custom background design in just minutes with all of your data on it along with a photo of your choice. You can pick from literally thousands of backgrounds, fonts and colors.
Create a Custom Twitter Background with Powerpoint
Here are the steps to create one. I’m using Powerpoint 2007 on a PC for this tutorial.
1. Open Powerpoint and select a blank slide.
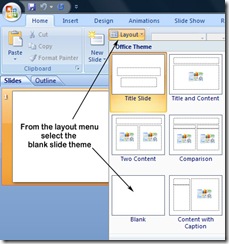
2. From the layout menu, select the blank slide theme.
3. From the design tab, select page setup
4. From the page setup menu, select On-screen show 16:10 for widescreen monitors or On-screen Show 4:3 for standard monitors. I’m using a widescreen monitor for this tutorial.
5. For this tutorial, pick the Apex theme from the design menu. You should now have a blank slide with a grey sunburst design as a background.
6. From the insert menu, click the shapes button and pick the rounded rectangle.
7. Click and drag a vertical rounded rectangle in the approximate size and shape as shown above, near the left border of the slide.
8. Click on the rounded rectangle you created above and then click on the Quick Styles Menu located on the Home tab. Select the black fill box with the white outline. This will format your rounded rectangle as shown.
9. Right click on your icon and select edit text. This will put a cursor on your rectangle. Enter the text you want for your background. You can change the font and font size from the menu on the home tab.
10. To add a picture, click the picture icon from the insert menu. Select a picture from photos stored on your computer. Once the photo opens, resize the picture smaller so it fits on the top of our rectangle as shown below.
11. Right click on the picture and select a custom frame from the picture Tools format menu. You can adjust the color and line weight from the menu.
12. Save your Powerpoint presentation on your computer and then hit the F5 button to view your finished slide. It should look similar to the one above. If it looks good to you, save it to your computer clipboard by hitting the Print Scr button at the top right side of your keyboard. If you need to continue editing, hit the escape key to go back to the main screen.
13. Once you have captured the screen to your clipboard with Print Scr, we need a way to save it to our computer. Unfortunately Powerpoint does not do a good job of saving JPEGs. The best way to get our screen saved is to paste it into a paint program. With most versions of windows the built in “paint” program works well for this task.
14. To open MS Paint, go to your start menu, select all programs, select accessories, and then select paint. Once paint opens, click on the blank screen and then hit control-V on your computer to paste your clipboard into the program. You should see your created page open in the program like the picture above.
15. From here we can save it to our computer as a jpeg. From the file menu in paint, select save as and save it to your computer as a jpg with a file name you recognize. Make sure the save as type is JPEG.
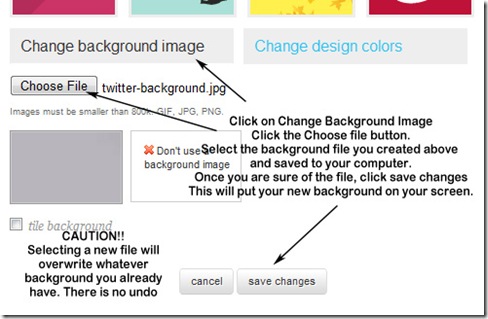
16. Now we can open Twitter and save it as our custom background. Login to your Twitter account, click settings and click on the design button. At the bottom of the page select Change Background.
Please Note! Changing The Background File in Twitter Will Replace The Old Background File and The Previous Background File Is NOT Saved. Please make sure you want to change the background before saving the new file. There is No UNDO Button!
Select the file you saved on your computer and click the save button. You’ll now have a new custom background
17. Now you have a custom background. If you need to make changes, just reload the Powerpoint file, edit the text, and follow steps 12-16 again.
Question: What kind of custom Twitter background will you create?


